|
|
Post by barclay66 on Jan 29, 2018 7:28:26 GMT -5
Hi,
Thanks! I should be able to give it a try now. I will let You know how it worked as soon as I receive the parts ordered and after finding the time for working on it...
Kind Regards
barclay66
|
|
|
|
Post by barclay66 on Jan 29, 2018 7:23:12 GMT -5
Hi,
The raster centering function in the help menus is completely unconnected to the convergence stuff. For horizontal position it adds a bias voltage to the horizontal deflection coils (using U7, U8 and U11 on the HDM). The vertical position works similarly by adding a bias voltage to the inputs of the vertical deflection amplifiers (U700, U800 and U900). It is possible, that the same circuitry is involved when moving the entire raster in the convergence menu. You could verify this by measuring the outputs of U8 on the HDM (Pin 8->RED, 7->GREEN or 1->BLUE) while using the controls (horizontal movement). If the output voltages don't change, then this raster movement is done entirely through convergence controls/amplifiers/coils...
Regards,
barclay66
|
|
|
|
Post by barclay66 on Jan 29, 2018 3:43:14 GMT -5
Hi,
By the way, the Marquee does indeed have the controls for moving the raster vertically and horizontally without using the convergence controls. It's just that unfortunately they aren't included in the geometry menu (where they would make much more sense to be).
In order to use these controls, You have to access the Guided Mechanical Setup menu:
To access and use the Guided Mechanical Setup menu, turn on the projector [POWER] then press [HELP]. The Help menu is displayed. Next press [2] to select Guided Mechanical Setup. The first page of the guide will be displayed on the projection screen. When using the guide, press [HELP] to display the next page, press [RECALL] to display the previous page. When complete, press [EXIT] to end Help.
Regards,
barclay66
|
|
|
|
Post by barclay66 on Jan 28, 2018 12:05:52 GMT -5
Hi,
Thanks, that would be excellent. I‘ll use any help I can get...
Regards
barclay66
|
|
|
|
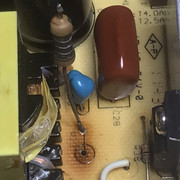
Post by barclay66 on Jan 28, 2018 7:40:04 GMT -5
Hi,
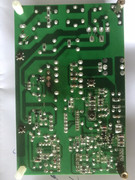
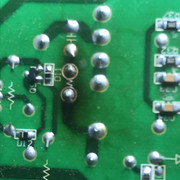
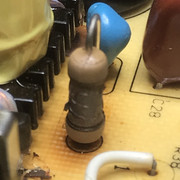
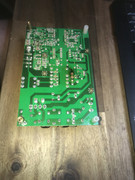
I opened up the unit and removed the QA board. By visual inspection it became obvious that HDMI input #1 has received a major punch. Several parts are burnt or even have disintegrated and at least one trace is burnt (see PCB picture). With measurements I was able to identify all defective or supposedly defective parts (see schematic excerpt) and have already ordered replacements (total value less than $30). Although it isn't certain that I will be able to revive HDMI input #1, I'm confident that HDMI input #2 might work again after swapping the switcher chip. At least I was able to dump the contents of its EDID EEPROM (24C02) which will be needed for programming the replacement on input #1...
Regards, barclay66


|
|
|
|
Post by barclay66 on Jan 28, 2018 7:25:39 GMT -5
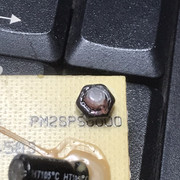
I have come across many of blown HDMI chips both in and out. Not uncommon. This does not appear to be a BGA ic. Are you sure it is or did you mean just ic205? Did you test the RGB input also? I believe you indicated you did with the VGA test but just want to be sure. It is somewhat tied to the same control of the HDMI in's. Hi, the HDMI chip is in a TQFP-64 package. Although it's a challenge, I might be able to swap it. IC205 is the video processor in a BGA package. The analog input works flawlessly (VGA input tested only, I don't have a component source). Regards, barclay66 |
|
|
|
Post by barclay66 on Jan 25, 2018 6:49:14 GMT -5
Hi,
I have received the unit for repair. First of all, I did an assessment of its current status.
Appearance:
- Mechanically and optically pristine
- Completely clean (air filter looks like new)
Things that work:
- All of the operating controls on the device itself and on the remote
- Power sequence
- Lamp (404hrs on it, 408hrs total)
- Fans
- Optical block (SXRD panels, iris, lens, alignment etc.)
- All of the internal menus
- Analog Input (VGA-Connector), perfect picture at 1280x768/60 (maximum res), EDID (DDC) data can be read from this port
Things that don't work:
- Either of the two HDMI inputs, not being recognized as display device when connected to a PC, no EDID data visible
Looking at the service manual leads me to the area around IC202 (HDMI input selector and buffer).
The next step will be measuring all relevant power rails (SUB5V, SUB3.3V, D3.3V) and if those are on spec then measure the activity of the HDMI data lines at the inputs and output of IC202.
According to its data sheet (TMDS261B) and how it has been implemented in the Sony, IC202 is controlled via several logic inputs. It would make sense, checking their status while switching the inputs via the remote. This could lead to the decision, if replacing IC202 could be the right way to go or if the problem could be related to the main signal chip (IC205). If this should be the case, I'd rather try to get a new QA board as I neither have the equipment nor the experience for replacing such a BGA chip.
What do You guys think?
Regards,
barclay66
|
|
|
|
Post by barclay66 on Jan 12, 2018 5:16:32 GMT -5
Hi,
What makes you think I would be involved with spreading or even starting any rumors?
My posts on Curts forum are quite rare nowadays and strictly limited to technical stuff. In most cases I simply get ignored and one of the ‘masters’ drives the topic completely sideways...
Regards,
barclay66
|
|
|
|
Post by barclay66 on Jan 9, 2018 5:36:21 GMT -5
Hi,
That's a whopping 18.5MB. Maybe You could provide me with an email address via PM. Then I can send it to You...
Regards,
barclay66
|
|
|
|
Post by barclay66 on Jan 8, 2018 4:18:17 GMT -5
Hi,
Will do. Finally, I went with the original manual from manualzone. No need to double-check everything...
Regards,
barclay66
|
|
|
|
Post by barclay66 on Jan 7, 2018 5:38:34 GMT -5
Hi,
I did a research on the HW15 and the HW50. From what I see, the HW50 should be the closest to the HW30. Both use the same lamp type and share most of the specs. It looks like the HW50 received an upgrade of the optical system for a better contrast ratio and it was released while the HW30 was still in production. I‘ll give it a try.
Thanks for looking this up to both of you!
Regards
barclay66
|
|
|
|
Post by barclay66 on Jan 5, 2018 17:15:42 GMT -5
Funny enough:
MP again has started one of his legendary threads with possibly fantastic results and a statement that he will share what kind of magic he did and how he did it. As usual, in the end there won‘t be neither hard facts nor any reproducable technical information. It‘ll slowly dry down like so many other threads of this type. Only difference this time: It‘s about audio gear.
Regards,
barclay66
|
|
|
|
Post by barclay66 on Jan 5, 2018 17:08:34 GMT -5
Hi,
I will be getting said projector soon. Owner says that it has intermittent picure freezes and other weird sympoms. I haven‘t been able locating a service manual on the web and would therefore kindly ask if anyone can make a copy available to me.
Kind Regards,
barclay66
|
|
|
|
Post by barclay66 on Nov 23, 2017 5:53:39 GMT -5
Hi,
First some general information on Barcos and their usage of I2C devices:
Barco projectors determine the presence and version of most boards by scanning the I2C bus for acknowledge signals. E.g. the presence of a Convergence-on-Green will be evident in the menus only if the I2C bus scan returns an acknowledge signal from the I2C address expected for a COG board (there seems to be a table of known I2C addresses in the firmware).
Many boards have more than one I2C device on them (especially the many electronic potentiometers) and there's a large variation of I2C device types.
For sensors there are three main variations: A sensor which itself is an I2C device (like the AD7416 on the fan speed regulator), an I2C A/D converter which translates voltages into digital values or an I2C I/O device which returns status (on/off) signals.
I2C errors will be issued if:
- The I2C bus is stuck (either data or clock line permanently high or low)
- Required acknowledge signals are missing (e.g. defective or missing non-optional boards)
- Timing issues are present
- Unexpected I2C acknowledge signals are present (this isn't verified yet)
In case of the fan speed regulator, the AD7416 will listen to address 4Bh. The firmware should show the temperature information as soon as the sensor is visible on the I2C bus. I don't know what Barco intended with the modification on the board. The capacitor doesn't do any harm but the diode could reduce the supply power for the sensor. You should measure the supply on both boards (pin 4 -> GND, pin 8 -> VDD at the AD7416). According to the datasheet, the supply voltage needs to be between 2.7V and 5.5V for correct operation.
I don't know where the sensing and I2C conversion are being done for the voltage display. It could be that the menu only supports one line for displaying either temperature or voltage. In this case, with temperature sensor being present, it could override the voltage display and would show the temperature instead.
Regards,
barclay66
|
|
|
|
Post by barclay66 on Jul 14, 2017 2:39:36 GMT -5
OK. If that's the case, I would swapped ic U32 then as per Barclay advise. Hi, Maybe I didn't describe this correctly: U32 could be causing the problem if ALL colors were missing. If only one color is missing, then U32 wouldn't have anything to do with it. On a stock VIM I would check U19 (SD5401 switcher). As Your board has been modded, it could be possible that U19 is missing or has been bypassed. In this case, the solution depends on the type of mod that has been applied and it could be possible that it can't be repaired without un-potting or replacing the mini board. In this context, Kurt's advice makes a lot of sense... Regards, barclay66 |
|