justin
Junior Member

Posts: 60 
|
Post by justin on Apr 24, 2016 21:21:30 GMT -5
hey all, i remember reading a post from the guy on the other forum who rebuilt quads; apparently the first cap in the series is smaller than the rest, eventually causing them all to fail? not just the silicon becoming conductive. he said it was almost like barco did it deliberately (to generate some spare parts revenue?)
|
|
justin
Junior Member
Posts: 60
|
Post by justin on Dec 26, 2015 6:17:50 GMT -5
hey casey, hows it going?
did you only replace the green with a simulator grade tube? i was quoted only a few bucks difference between a sim tube and a standard lug from greg. i will have a replacement lug blue soon and considering a sim green tube. looks good. was the silicon hard to flick out?
regards,
justin.
|
|
|
|
justin
Junior Member
Posts: 60
|
Post by justin on Dec 21, 2015 2:47:10 GMT -5
okay. i feel like when calibrating i need a fresh set of prescription glasses. i find myself squinting alot looking for the 'best' range of adjustment.
anyway, i am trying to fix the corner focus and turning the nuts on the scheimpflug feel dicey as. i feel like i am going to snap something?
|
|
justin
Junior Member
Posts: 60
|
Post by justin on Dec 21, 2015 2:14:34 GMT -5
i spent an hour making a portable cabinet for the projector (so i can use it more frequently until it gets a permenant mount.) the guy on the left isnt much help!   |
|
justin
Junior Member
Posts: 60
|
Post by justin on Dec 21, 2015 2:09:07 GMT -5
redfox, i managed to make the smered image clear up in the bottom left side of the red tube (however, bottom right and top are the same still.) i used the manual astig adjustments on the back of the neck. theres fine blue marks where i presume the handles are supposed to line up?
theres two adjustments on each handle. i can swing it around the tube and then i can twist the handle.
after watching the video mentioned earlier, i understand astig is just making the dot on the test pattern displayed round. i have some serious flaring going on around the entire final image. what i cant wrap my head around is what i am supposed to do. my understanding is to get all mechanical adjustments as close as possible, and use midpositions for all electronic settings before i begin calibrating electronically. if i use electronic astig through the menus, it says to use the focus control on the remote to defocus the image. i dont understand why i do this. am i supposed to get the center astig perfect with mechanical handles? then use digital adjustments to fix the rest of the image?
i am struggling here. curts page about astig is confusing :S
|
|
justin
Junior Member
Posts: 60
|
Post by justin on Dec 20, 2015 9:15:17 GMT -5
thanks casey. i definately had it set to read volts dc. i was just trying different measurements on the meter and its not right. i will have to pickup another from jaycar tomorrow to measure this hoop.
where you are pointing, thats where i measured from. this meter has been in the garage toolbox for some time. it should have been fine. not sure whats happened with the arcing.
clearly the set shut down to prevent damage. but could something else have let go? i know you'd only be guessing.
speak soon
|
|
justin
Junior Member
Posts: 60
|
Post by justin on Dec 20, 2015 8:18:00 GMT -5
okay i looked at the eht again (i did come across your thread for the wobbly horizontal image, where you later found the fried inductor, but didnt know it was on the eht board.) i looked at the inductor and it looked fine (quite clean on one side, the other had a buildup of dust on the heat wrap.)
|
|
justin
Junior Member
Posts: 60
|
Post by justin on Dec 20, 2015 8:07:34 GMT -5
okay well shite! i just lost a couple years off my life. i found that hoop on the smps no worries. tested my voltmeter on a battery to make sure it was working correct. stuck the negative on the chassis and touched the hoop. what happened next i was not expecting...!! a small spark came off the hoop and shut down the set. it came back on and turned off twice more before i could pull the power from the wall. i hesitantly inspected the rear and no smoke or anything visible. i then plugged it back in and the set started up just fine. f***ing paranoid i nuked something, i just went through some menus and waited a while. all seemed good? touch wood. i took quite a fright lol...! i decided to use the internal menu and apply a full white and full black after that. below are the results (also shows the sets current hours.);  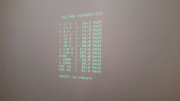 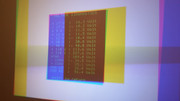 3164h, 20m is the sets current mileage. that log with eht fault was some 335h ago? is that correct? |
|
justin
Junior Member
Posts: 60
|
Post by justin on Dec 20, 2015 7:00:37 GMT -5
i dont know anything about astig. the projector is now in my spare room and i reset all midpoints to default (deleted all memory of my previous convergence settings.)
i never touched the astig as i didnt understand it. i didnt have sharp edges. i had a reasonably sharp center though.
i have since watched this video on youtube "A to Z, Sony VPH 1292 CRT projector alignment how to";
^ i learnt a few tricks from this. i am going to drag the projector back out tomorrow for another crack at calibrating.
|
|
justin
Junior Member
Posts: 60
|
Post by justin on Dec 20, 2015 6:54:56 GMT -5
casey, this noise i see is like a blotch of streaking or smearing? its transparent. it is smudging the output (whatever i display.) you know what, it very well could just be as you describe! astig is the corner adjustment? is that correct? its on the sides and is about an inch wide on either side. and in the middle at the top of the tube face too about an inch wide.
|
|
justin
Junior Member
Posts: 60
|
Post by justin on Dec 20, 2015 6:50:32 GMT -5
oops these replys happened while typing my reply. okay! i had to remove the eht (didnt know it was that at the time) to get to the quad anyway. i had a look at it and it looked fine. i just downloaded the barco documentation from the pinned thread. i now know which board is which. the picture i put up earlier with the corrosion, that was from smps1. smps2 looks fine. i dont know where to place the voltmeter to read 17v casey? i looked at the internal diagnostic page that output voltage the other night and took a photo. i understand this is not what you are describing i need to do. 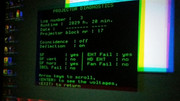 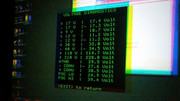 also, i dont know anything about astig. i never touched it. i read through my user manual i need to turn those nuts on top of the lenses? correct? |
|
justin
Junior Member
Posts: 60
|
Post by justin on Dec 20, 2015 6:35:56 GMT -5
its good to know barco, just like car manufacturers, made a part prone to failure to keep their spare parts department busy! then, they put it in the hardest to reach spot for servicing. if my hands were any bigger i'd have to remove a whole side. lol! i worked out a good little trick for getting the screw and nuts in from the side of the case. i put a bit of blu-tack on the inside of my socket (attached to a screwdriver handle style socket piece) to stop the screw/nuts from falling out and into the set. anyway, i got the quad out. it doesnt show any signs of arcing. around the seal where the pink hv cable comes out, the hose moves around quite freely. not sure if this compromises the silicone any (letting air into the unit?) 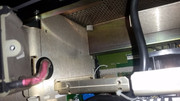 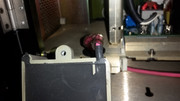 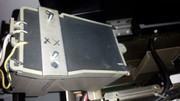 i guess i'll just have to buy a spare of quad, power supply, eht and smps? wont hurt to have them lay around (except maybe the quad. those things are shite!) regards, justin |
|
justin
Junior Member
Posts: 60
|
Post by justin on Dec 19, 2015 23:30:14 GMT -5
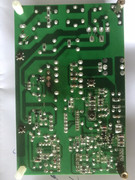
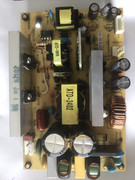
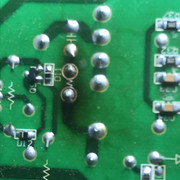
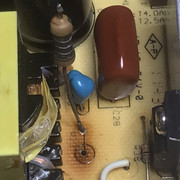
i cant pin point the noise. its between the power supply and smps? i took the black metal covered board out (thats the smps correct?) and had another look over it. i can see this is corroded. i am about to head out, but will dissasemble the board when i get back. as well as remove the quad. do i need to take caution removing the quad? can i get a nasty zap? or is it sealed and okay to handle?  ^ this is after a second inspection of the black metal covered board. note the black dots around the heat sink and other components. this is what i can see on the power supply and smps. its everywhere in that back corner! thanks! |
|
justin
Junior Member
Posts: 60
|
Post by justin on Dec 19, 2015 17:18:51 GMT -5
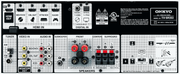
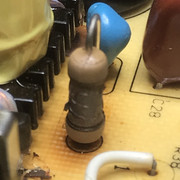
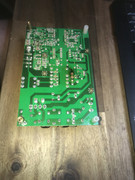
hello all. i read through some earlier threads here to see if anyone has had this same issue, but couldnt find anything. my cine 9 has some image noise in odd spots on the tube faces. i managed to take a few photos of the noise i can see through the red lens. the odd thing is, its really severe on the red. the green and blue have noise, but almost not visible. the red tube has this noise in the left and right upper section, and down the bottom right in the middle. its hard to pin point if its in the same spots on the green and blue as its only very light, but everywhere i concentrate looking?   i have black singe marks on a set of yellow wires on the power supply. i removed the power supply and smps and looked for anything burnt. nothing visibly wrong that stood out to my untrained eye there. 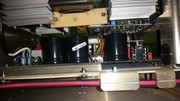 ^ if you look across to the smps, there is a yellow board. on that yellow board there was black dust like stuff on it. i could wipe it off with my finger. makes me wonder if something is on the way out. 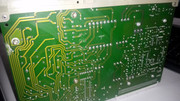 ^ this is the back of the smps. is that white stuff corrosion? is this part of my problem? or a trail i can follow to the problem? i recorded a video of the quad/psu/smps area when i turn the cine 9 on and its on standby; ^ the camera picks up some more audible noise i cant hear over the fans. it sounds like a capacitor hiss or? anyway, to confirm the artifact i am seeing isnt source related, i changed the way i fed the cine 9. i did dvi-i out from my pc to a vga/bnc cable. then i did hdmi out from my pc to a hd video convertor to vga out, then to a vga/bnc cable. i remember seeing this noise when i had the projector setup in the lounge room through a pioneer bluray player also. if i go into the random access menu and use the cine 9's grid pattern over the source (1080p), the image wobbles left to right? is this normal? anyway, i hope i have given enough information to help trouble shoot this. speaking with another forum member it sounds like a quad failing. i do not have any other boards here to swap out to test either. thanks for your time. regards, justin. |
|