|
|
Post by barclay66 on Sept 22, 2016 2:21:06 GMT -5
Hi,
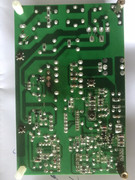
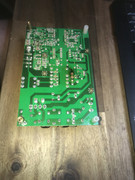
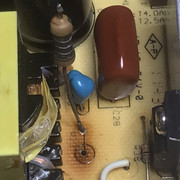
You can connect the positive lead to the point with the marking 'Vout' and the negative one to 'GND1' (visible on the third picture). Use these points for measurement if You want to make sure that the voltage You're feeding matches the one generated by the onboard power supply. Avoid contact with any surface at the primary side!
Regards,
barclay66
|
|
|
|
Post by barclay66 on Jun 29, 2016 2:42:32 GMT -5
Hi,
Finding a replacement could be more tricky than You think. Other parameters like Total Power dissipation, Gate Threshold voltage, Input/Output capacitance and switching characteristics shouldn't be too far off. I have checked several vendors and haven't yet been able to find any suitable replacement. I will keep on looking...
Regards,
barclay66
EDIT:
Just found two candidates from Cree: C2M0080120D or CMF10120D
|
|
|
|
Post by barclay66 on Jun 28, 2016 6:34:27 GMT -5
Hi,
Is that the EHT board (R7627165) and what's the component number (I... if it's an IC)?
|
|
|
|
Post by barclay66 on Jun 24, 2016 4:06:42 GMT -5
Hi,
I don't think so. The IRIS board connects to the controller via one larger connector and to the camera with a small one. No connections to the neck boards...
|
|
|
|
Post by barclay66 on Jun 24, 2016 2:25:26 GMT -5
Hi,
Can You show some pictures where it connects to the controller and at least one of the neck boards? Maybe the connectors over there shed some light on its function.
Those three identical chips are A/D converters specified for up to 100KHz (quite slow, definitely not for digitizing video signals). So I would believe that this board reads some kind of slow-changing value (e.g. average beam current) and tells something back to the controller. Maybe it was used for evenly adjusting brightness and/or contrast levels in a blend configuration. Or it could monitor tube aging for keeping the picture brightness constant over time. Would be quite useless in a single PJ configuration.
What happens if You disconnect it? Some kind of error message and/or missing menu items could yield more information...
You asked about this and another board about a year ago on Curt's already, didn't You?
Regards,
barclay66
|
|
|
|
Post by barclay66 on Jun 17, 2016 14:22:10 GMT -5
Small world, isn't it?
|
|
|
|
Post by barclay66 on Jun 16, 2016 17:11:04 GMT -5
Just to make sure You know about it:
Someone (I don't know to this person) currently is selling two BR 909 split packs on eBay in Germany. Both chassis have about 23K hours on them and the tubes will most likely need to be replaced. Search for "Barco Reality 909" if You want to look it up. Auction ends on July 14th...
Regards,
barclay66
|
|
|
|
Post by barclay66 on Jun 15, 2016 6:50:06 GMT -5
Hi,
It always makes me sad when I have to experience that people (and in this case I would consider both being fellow forum and hobby enthusiasts and even friends to me) keep on arguing for no apparent reason. Maybe I can try to cool down things with some clarifications:
The Barco Cine 9 (the one that Case is referring to) was designed specifically for the home theater market. It therefore received a cooling system which would allow it to be used in such a scenario. Although it could be possible optimizing it even further, the necessary effort will rarely yield enough improvement in order to make it worth trying.
The Barco Reality 909 (the one that tschaeikaei is referring to) is a high-end industrial-grade projection system intended for the simulation business. There, performance and reliability dominate over comfort. Its stock cooling system in fact is quite noisy and using it in a home theater may require modification of such a system. There are several options (hush box, fan replacement, hardware/firmware modification etc.) available and the addition of an external control PCB just adds another option.
I just had the impression that You were talking apples and oranges (in German it's apples and pears)...
Regards,
barclay66
|
|
|
|
Post by barclay66 on May 12, 2016 4:20:15 GMT -5
However I would not advise to mix the new and old neckboards even if it is technically allowed, because they are two different designs, and as such they will surely will behave differently both in drive and in bandwidth. I don't know if do you have skills to solder delicate parts (or you know someone who can do such job), but as I see a better way would be to transform the 81771-02H board to 2-270340-01B. Schematic diagrams are available for both boards and only three parts needs to be replaced (they cost nothing). Hi, It's a bit more than that. In total there are six parts to be replaced and the trimmer (R64) needs to be readjusted (does any one know how to set it correctly?). I have some 81771-01 boards which have been factory converted to 02-270340-01 by VDC. There's at least one additional resistor that they mounted on the solder side. I can look up what exactly has been done, but I wouldn't recommend doing it to anyone not having enough experience in replacing SMD parts...

Regards,
barclay66
|
|
|
|
Post by barclay66 on May 10, 2016 3:01:23 GMT -5
Hi,
Just to make things perfectly clear: There are two independent issues involved.
Issue A: Setting of the jumper and installation of the G2 connector wire. This is explained in gjaky's post above (Jumper on A and G2 Wire removed -> LUG; Jumper on B and G2 Wire installed -> LCP). You can easily do that by yourself.
Issue B: The 3rd VNB (P/N: 81771-02H) doesn't work with VNBs of a different type. You need to replace this one with a regular VNB (P/N: 260339-01P) or another new type one (P/N: 2-270340-01B).
Regards,
barclay66
|
|
|
|
Post by barclay66 on May 6, 2016 1:54:58 GMT -5
Look for "Roederstein EGD datasheet". On my search it was the first link...
|
|
|
|
Post by barclay66 on May 4, 2016 2:29:33 GMT -5
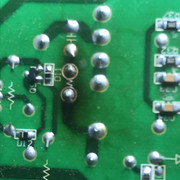
Those star pin capacitors, are those positive on the centre pin and negative on the outers? Yes. |
|
|
|
Post by barclay66 on Mar 14, 2016 11:23:59 GMT -5
And I feel kind of stupid because in the picture it seems I made a spark gab? You will have to clean up this mess ASAP! This silver stuff is conductive and doesn't work for this application. When applying the new paste, only put a small blob onto the middle of each surface. It will be pressed into a (hopefully) thin layer what it is supposed to do. For this stuff the more isn't the better. Also make sure that You don't have any broken traces. The one around D111 looks quite damaged... |
|
|
|
Post by barclay66 on Mar 14, 2016 11:18:55 GMT -5
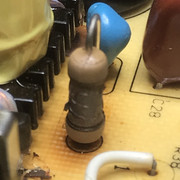
Ok it is not C102. I am also checking the possebility that the collector that is in the middle of the three legs somehow shorted to the heatsinc. Perhaps to much silver cooling pasta? Well, that type of thermal conducting paste might work good for CPU coolers but not for a SMPS. Also, what You described as plastic sheet should be a glimmer sheet. The transistor must be completely isolated from the heat sink. Check that the glimmer sheet has no holes or cracks and use the regular white thermal conducting paste... |
|
|
|
Post by barclay66 on Mar 14, 2016 10:22:09 GMT -5
Hi, You can test with the SMPS without Q101 in order to see if both TDAs (they share the power supply) get their supply voltage. The set might go into protection though. If you override the protection, make sure that the heater voltage to the tubes is disconnected. Otherwise You will burn the tubes (no H-deflection). If You manage to get it working without Q101, check the output voltages at the other part of the SMPS (e.g. +17V, +12V, -9V etc.). If those measure ok, then this part of the SMPS is OK and we only have to worry about the HTHD part of the SMPS. There check D114, R101, D101, D111, R103, R109 Regards, barclay66 Edit: You might want to read the TDA4601 datasheet. It will give You more information on its working and where to expect specific votages/signals. See here: www.micropik.com/PDF/tda4601.pdf |
|