|
|
Post by ratty on May 9, 2017 14:34:36 GMT -5
Hey guys,
so I have this NEC HT1000 that has been with me for a while now. Until three or so years ago, it was on it's first bulb, above 800 hours, but it was getting very dim. Near the end it started acting up, forgetting to project the colour red occasionally, than one time it simply refused to start the bulb. It goes through the motions, but I don't get the 'whizz' sound of the lamp starting up, then it starts blinking the lamp led.
This projector series has been prone to having problems with the lamp circuit too though, so my question is, is there any way to actually test the bulb (short of sticking it into a different projector)? Getting a new bulb would still be cheaper than getting a second hand PJ that may or may not keep working.
PS: This is just a last-effort to save this thing from the trash because I don't want to buy another digital if I don't have to. (But I want to, just to have a reference for geometry setups of my CRTs, and while low-res, this projector had a decent enough lens system to give me a bright and big enough pic.)
Thanks for any tips!
|
|
|
|
Post by ratty on May 9, 2017 12:28:43 GMT -5
Tiny little update, the tubes are not leaking afterall! I've left them on my workshop desk since Sunday, and looking at them now, there's no sign of any moisture! Now if only the COG board would arrive, I'd be in business. Italian post are really taking their time!
|
|
|
|
Post by ratty on May 7, 2017 16:17:20 GMT -5
The stray glycol shouldve been washed away or dried up, it wont really dry up by its self. There may or may not be a leak. Comparing caps from the 80s to current lines available is not exactly an accurate test. I tried to actually wash it off but didn't want too much water around the more sensitive parts of the tube assy. Having wiped it clean again in the morning, so far so good, looks like it may just have been what little seeped into the unused screwholes in the housing. I won't really be able to do too much till next weekend anyways, so I put'em on new paper towels and we'll see how it goes during the week. Indeed it's not an accurate test of current lineup, for caps, no matter what you use, you'll only find out how good it was when it starts failing. The values given by the manufacturers about how many hours a cap will live are guidelines at best, but going by the track-record, I'll stick with Elna. And not the RoHS compliant versions. RoHS is pretty much an excuse for manufacturers to make shit tier products under the flag of eco-protection. Anyways, today's log: -Finally got around to making a screen instead of projecting onto a wall. Would you believe white swimsuit fabric is an amazing screen material? It really is! Yes gain is probably below 1, but compared to a painted wall? It is glorious. Because of the inherent reflective properties I am getting approximately the same gain as from the painted wall, but haloing is almost completely gone! (Still using the AC BG808s) Things I could barely read previously are clearly legible, and where I previously only saw a grey box instead of 1pixel lines, now I can see them clearly. The only downside is that it does let some light through, so I will need some form of backing material for it. I'd get some white blackout cloth (That's what I originally wanted to try projecting onto), but the only kinds I can get here in white have a visible sewing pattern and are damn expensive in widths above 1.5meters(~30-50USD/meter). I'll probably end up just hanging some black cloth on the back side of the frame to kill the reflections. -Noticed some noise in the image in the busier parts of one of the test patterns I used. I went around my RGB switcher, but that was not the source of it. Might be the AC cord running parallel with the RGB coaxes? Will have to check on that. -Will need to move my projector mount to the side some to accomodate for the new screen... more holes in the ceiling... -Started re-assembling the Onyx, well... it's in progress...  |
|
|
|
Post by ratty on May 6, 2017 14:43:34 GMT -5
So after leaving the tubes for over 24 hours, it seems all three may be leaking under the C element. (May because it may just be the remaining glycol under the mounting ring itself, though at this point I think it should have stopped.) Is it possible the C-element's edges are thinner for the HD18 than the HD215? Anyone have exact dimensions for the o-rings?
As for the caps, that might be my next task. I prefer to use Elna caps myself if they are available in the size needed. Actually want to try some of the Elna Silmic II high-end audio grade caps in the video path, see if they do the same wonder for image quality that they give for audio in studio equiment. They are also the only cap brand that I have not seen fail in mass amounts yet, and I pulled apart a Toshiba VCR from the early 80's for fun last year, which was loaded with Elna caps, which all tested good! That's one hell of a track record, remaining on-spec for nearly 40 years!
|
|
|
|
Post by ratty on May 5, 2017 17:18:07 GMT -5
Today's log: -Tested HD215 C-element with HD18 and the new shortened mounting rings hoping to get away without having to actually dismantle the C-elements. It is now clear that the HD215 C-element will not work with the HD18 no matter how the lens is adjusted in relation to the C-element. -Installed HD18 C-elements and new mounting rings. I had them machined so there would be a .5mm*.5mm rim on the inside that has a double purpose. It helps center the HD18, and blocks light from escaping, as there's a countersunk area in the HD18's base. EDIT: Please noone use the below measurements, they are not fit for the HD18 after all. Measurements for anyone wanting to do this conversion (and so I don't forget for the next set :
Mount the original mounting ring in a lathe, and take off a full 3.5mm from the face of the rings. Now start taking off another 0.5mm from the freshly machined face, but this time go in only to 67,5mm from the center. If done correctly, this will leave you with a 0,5mm x 0,5mm shoulder with an outer diameter of 135mm. It should still leave you with slightly more than 3mm of material where the lens mounting screws go, which is safe enough even for the heavy, metal housed lenses. If done correctly, that little shoulder will be perfectly sized so that the lens base will fit on it snugly and block all light as well.
Keep in mind I have the metal housed lenses, I am not sure if the plastic ones differ.
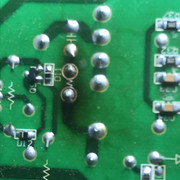
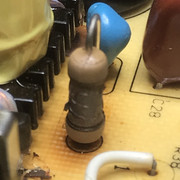
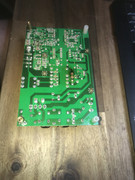
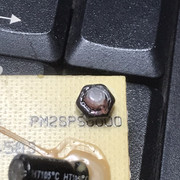
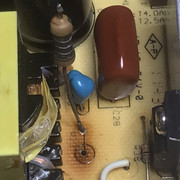
-Managed to spill glycol because I'm a dumbass. Of course where do all the sheet metal parts lead any spill? Right onto the backpane... Took it out (damn that was a pain in the ass to do) to wash it off proper. So instead of assembling things, I pretty much ended up taking it all further apart. -On the upside I found the source of the 50hz humm in my RGB switcher. United Chemicon filter cap. It was pretty much the only one I didn't replace as the mains filters rarely go bad. It shat all it's lyte out, and éiterally ate through it's own leg. To add insult to injury it wouldn't start up after the cap was replaced... that turned out to be a corroded ground cable. WARNING: Based on my recent experiences with United Chemicon caps (These are the ones that usually have KME or such markings on brown backing, regarded as good as Rubycon or Nichicon), these are also rapidly going the way of the dodo, like the Rubycon(? or was that Nichicon? I don't remember) caps in the NEC. Barco projectors use a -shitton- of these caps. On the upside, the lyte in these seems to be different from the Rubycons in that it dries much easier, and doesn't keep on eating your PCBs as intensely. In most cases there is no actual leak, they just dry out completely. In the past 2 years, I have had multiple powersupplies from the 90's that had these capacitors either already dead, or failing. In every instance, virtually all capacitors of this brand were affected. Now another one in my switcher's powersupply, and pulling the Barco apart, I noted it had a lot of these caps in the convergence tray and some on other boards as well. I am now starting to suspect these for whatever little niggles my 808s has. 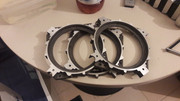 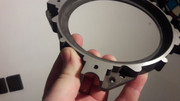 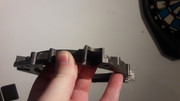  |
|
|
|
Post by ratty on May 5, 2017 5:34:37 GMT -5
Not really, the two PJs have the exact same boardset in them, once I have the same software and the same tube/LC setup, the only thing different will be the case colour (Okay the Onyx supposedly has a scaler too but that's not going to get any use anyways.) I have the reworked mounting rings fresh off the lathe, time to do some screwing  (Right after some RGB cable and RGB switcher repair...) |
|
|
|
Post by ratty on May 4, 2017 9:40:58 GMT -5
What the topic says, looking for one more set of HD18 lenses (would prefer the lenses with aluminium housings as that is what my other set is) with C-elements, plus a set of 8" tubes if the price is right (Barco LC housings on them are a plus!). If you have anything of the sort, send me a PM please!
Thanks!
|
|
|
|
Post by ratty on May 4, 2017 7:28:58 GMT -5
Mounting rings are at the machine shop, should be ready by tomorrow noon. If so, by tomorrow evening the Onyx will be on my ceiling.
|
|
|
|
Post by ratty on May 4, 2017 6:27:28 GMT -5
Yes the glycol is the same. ... Thanks for that info, that's good news cause I have enough to replace all the yellowed fluid Personally I found the geometry and convergence very easy to dial in and had no issues being too coarse. That is on my 808s. I have yet to do that all on the Onyx. By the time I'm done with them, both PJs will be virtually identical. In fact they are already identical aside from the tube types, and I have the LC chambers, just going to need a second set of HD18 Lens/C-element. I suppose I will have to program some eproms so the software is the same too, but that's no problem. |
|
|
|
Post by ratty on May 3, 2017 16:06:41 GMT -5
I tried direct-mounting the tube to the existing retaining ring, but in the rearmost position of the focus knob, there are 5mms between the c-element and rearmost lens element, and that is still too much to have anything resembling a focused image. The full-back position is where letters of the menu just barely begin to take up shape. I would experiment with exact placing if I had something else to hold the C-element in place that allowed me to move the lens closer. I will see if maybe I can find big enough washers to just keep the C-element in place and hold the lens in place by hand.
Is the glycol in AC and LC housings the same?
|
|
|
|
Post by ratty on May 3, 2017 15:23:23 GMT -5
Gjaky, yes, but I have vanilla and plus NEC units only Plus... I wanted to make some screenshots from my 9pg, and powering it on I just blew another convergence board... Lucky I still have 6 spare STK ICs, but now both PGs are coming off of my ceiling (The other had the blue tube's coolant chamber glass crack. This is the one that had the glass replaced with regular glass by the previous owner, and I saved a bunch of glasses from the bad tubes, so no big deal, just time-consuming to fix.) |
|
|
|
Post by ratty on May 3, 2017 15:13:27 GMT -5
Okay so I dismantled my extra LC chambers and checked this and that and how they're supposed to go together, and I have a few questions I'd really appreciate some help with. 1) It would be nice if someone with a G70 or XG could chime in on lens-C element distance. I would like to know how much distance there is supposed to be between the flat outer plane of the C element , and the metallic (or plastic?) rim of the rearmost lens element, when the main focus knob is all the way to the back. I think they're not supposed to meet, but I'd like to be as precise as possible. I am simply going to have someone with a lathe mill off a few milimeters from the rim of the C-element retaining ring so the lens moves closer, and that should solve all my problems, but I don't want to mill off more then I'll need so as not to weaken the ring too much. Case in point, if I mill off 5mm, with the focus knob fully back, the rim of the C-element and the rim of the rearmost lens element will just touch. I am pretty certain that is unnecessary, and it will only leave 2.5mm of material left for the lens bolts. Even with washers or nuts I kinda think that's too thin. If noone can give me info regarding this, I will have 4mm milled down. That'll leave 1mm between the C-element and lens. If it turns out that that is still too far back, I can always add washers for spacing the lens further. That will also leave 3.5mm of material left for the lens bolts, which, with a nut and a washer added from behind, should be enough to support the lenses safely I think. 2) Light leak between lens and C-element. Does this actually have an effect on projection (aside from possibly allowing dust inbetween)? 3) Glycol... Is the stuff used in LC the same as used in the coolant chamber with AC projectors? How 'white' is this stuff supposed to be? What I got out of my extra LC chambers is completely clear (no haze or fungus or floating things inside) but it does seem yellowed. What I got out of my AC chambers previously was always very nice and colourless. (And yes I do have all that AC coolant stashed safely |
|
|
|
Post by ratty on May 3, 2017 11:17:12 GMT -5
That gives me a rough idea of what order to do things in, thanks! I'm waiting on my COG and Contrast mod board as we speak... Italian post guys are taking their time Currently I'm experimenting a bit with lenses. To clarify for those who might be looking for info on replacing HD215 on their barco (because there's a ton of contradicting information floating out there). Physically, you can mount a HD18 in place of a HD215 without any modification or the addition of a mounting plate (though there will be minimal light leakage between the lens and the LC chamber rim). But unfortunately the C-element would require the lens to be closer to the C element than allowed by the mounting ring on the LC chamber. So HD-215 C-elements will not work with HD-18 lenses, unless you are willing to have a few milimeters machined off of the rim of the C-element retaining ring, or mill the focus-bolt slot longer in the side of the lens. Since I don't want to have to mill anything, time to replace C-elements with the ones for the HD18. I would love to get my hands on a set of HD117-24 to see if it'll work with the same C-elements as the HD215. Addenda: During my googling, I found Decibel's posts about his play with the LC hardware, thing is, the LC chamber+plate seems different from what I have in the Onyx! |
|
|
|
Post by ratty on May 3, 2017 3:42:15 GMT -5
Well neither of my vanilla PG sets can get near as small spot-size as the Barcos even after having replaced every single dying capacitor in them. Yeah the point convergence in the PG has a lot of points, but whereas on the Barco, I have +/-50 range of the adjustments and every single 'notch' makes a slight change, the PG also has +/-50, but visible change only occurs every 2 or 3 notches. It has more points to adjust, but often you can only overshoot or undershoot your target position with it. It's like less adjustments that are more accurate, VS more adjustments that are less accurate. Depends on the size of your screen how much you will notice that. On the other hand, the "non-point" geometry and convergence settings of the Barco are much nicer. It's easier to do a good basic setup on a Barco. Overall, I have to say they're evenly matched. The NEC has better colour out of the box, and more point convergence points, but due to the lack of precision in the adjustment that is only an advantage on smaller screens, plus it was never meant to use the tube-face completely, which means you'll either run your chassis extra crispy (it's not cool to begin with) or loose from the machine's ability to physically resolve higher resolutions. The 808s has the Sony tubes which are definitely sharper (even with misaligned magnetics), it has the 'twisty knob' focus rings that I much prefer over the rotating tabs of the NEC, With a HD6/HD145 you can get pretty much the same image as an NEC, but better tubeface use ergo better resolution of the image. The basic convergence and geometry setup is definitely better, the downside is the 'zone' convergence which admittedly gives too few zones of adjustments, but at least the adjustment itself is precise enough for my 3 metre wide screen where I don't have over-/under-shooting problems. My solution to the zone convergence thing is to do the best possible basic setup with the test pattern slightly larger than the screen, so I don't have to care about the very edges, then use an active image that's just that slight bit smaller (which still gives me near full tubeface use). Onto the topic, got my blending units yesterday, and my HD18 set. It's the metal encased version to boot! They're going to make my projector weigh a few kilos more Now if only the COG and contrast mod boards would finally arrive... |
|
|
|
Post by ratty on May 2, 2017 6:58:27 GMT -5
Mechanical setup was done as well as possible considering the circumstances, but I will re-do it anyways when I actually get around to installing a proper screen. Currently projecting onto a wall, so it might just be due to uneven-ness of the surface.
|
|


 (Right after some RGB cable and RGB switcher repair...)