|
|
Post by jeremy on Jun 21, 2014 9:04:43 GMT -5
Ahhh not a surprise that theres no schematic for the HDMI board. I'll check the regulators and let you know what they read. I don't have a 2nd one of these with a good HDMI to swap in to see if its the HDMI board only, but I am confident it is. I've had a few other Pioneers that I sold cheap because the HDMI wouldn't function/fully function. Some people don't even want the receivers for that even.
The funny part is, these receivers were not supposed to even power on; but most of them do, they just have weird issues, only one had a blown amplifier which was a bit of a surprise given the last load of HTR's that I serviced had mainly blown amps, and these are similar models.
Anyway, I'll let you know what I find!
|
|
|
|
Post by jeremy on Jun 18, 2014 12:14:22 GMT -5
The 5v line reads 5v as well
|
|
|
|
Post by jeremy on Jun 18, 2014 12:12:57 GMT -5
MT, Checked all the 3.3v voltages, all of them read 3.3v
|
|
|
|
Post by jeremy on Jun 16, 2014 9:30:28 GMT -5
MT, finally back at this receiver. I was wrapping up the VSX-09TX I started oh so long ago.... bad motherboard, speaker output board, and the amplifier!! Honestly I haven't checked the motherboard or speaker boards for what components were bad, I used another very ugly but fully working 09-TX to rob parts from. Good thing I did, because I wouldn't have found all these issues the way it was going. Oh... and I HATE those damn ribbon cable connectors Pioneer used, what a PITA to deal with!! ANYWAY - Regarding this receiver, I checked the HDMI with only an input signal going to it, still blinking HDMI, same with only an output HDMI from the receiver. Basically, it does nothing besides blink at me; almost taunting-like  Awaiting your orders  |
|
|
|
Post by jeremy on Jun 12, 2014 12:27:29 GMT -5
MT, Sorry I haven't replied yet, I'm actually wrapping up a receiver that's been sitting around just so I have a bit more room. I'll get back on this today though as long as this receiver im finishing up stays cooperating. |
|
|
|
Post by jeremy on Jun 10, 2014 15:50:31 GMT -5
Also for what its worth, I'm feeding the receiver a 1080p (and did 720p as well) signal with audio from a known working Pioneer BDP-HD1 blu-ray player to test this. Audio and video both come right up on the TV once I swap the HDMI from the TV going to the receiver-into the Blu ray player directly.
|
|
|
|
Post by jeremy on Jun 10, 2014 15:47:25 GMT -5
Hey hey, I finally have a few more HT Receivers to play with! I know I have the "Big" Denon that I asked about and never did finish with you MT (We will get there soon  ) but since I'm keeping that, its not a priority. I have about 12 home theater receivers I managed to pick up for less than the price of one new one, all with some sort of issue or another., (the main issue with most is they wont power up at all). ) but since I'm keeping that, its not a priority. I have about 12 home theater receivers I managed to pick up for less than the price of one new one, all with some sort of issue or another., (the main issue with most is they wont power up at all).
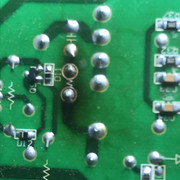
This VSX-519V however powers up, and audio via tuner and analog inputs works. The HDMI In for video/audo and Out for video/audio does nothing at all. The Receivers display blinks HDMI and that's where it sits. I have gone through the minimal menu this receiver has, and didn't have anything on HDMI (though I am using a remote for an 18 year old unit so it may not be fully compatible with the receiver.)
I've done everything I can think of before attempting to service the unit, and visually staring at the HDMI board of the receiver shows a very nice looking but (obviously) not working HDMI board. No noticeable bad components on the board.
So oh wise one, where do we start? |
|
|
|
Post by jeremy on Jun 4, 2014 12:10:43 GMT -5
This is interesting to know as I have had some "concerns" with image quality on my XG1100. I don't have this specific problem thankfully, but I do have one problem that has bothered me since I got the projector. Something with the blue tube... I'd have to start a thread of my own and take pictures to show exactly what I mean, but if I could ever remedy the problem, I would probably fall in love all over again with the XG, other than that issue, it is one hell of a projector to watch!!
|
|
|
|
Post by jeremy on Jun 3, 2014 10:51:07 GMT -5
I was given this Dynex DX-L40-10A 1080p LCD TV From a company I liquidate equipment for. The issue with it is the standby LED would illuminate, but you could not get the set to power up via the touch buttons on the side, a remote, etc....
Some symptoms you may notice with your set would be: loud cracks from the speakers, the TV set not displaying any image, unresponsive buttons on the side of the set, and/or remote, standby LED on but set will not power on, screen illuminates black (backlights come on) but no image from the internal menu OSD or source device. All of these problems can be remedied with the same solution below:
I decided to look it up on the net first before I took it apart just to see what the common issues are with the set, and if anyone has had the same problem and possibly a solution (why not take the easy way out if its available? ). Needless to say, most results turned up absolutely nothing useful, but a plethora of people having issues with this set. The most relavant topic I found was a set like this that had a similar power issue, not quite the same, but similar.
I later found the service manual, and in the SM it says the symptoms I am having suggests replacing the main control board of the set (the one with the HDMIs and other I/O), part 122917. It is also listed as a best seller on partstore (I wonder why? *eyeroll*)
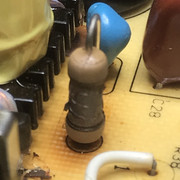
Anyway, instead of buying another future-defective board, I went ahead with replacing ALL the capacitors on it. These have to be some of the CHEAPEST capacitors you can find anywhere... The brand is "PEACE". Too bad all they do is cause anger and hate towards the set!
Anyway, there are 8 470uf 16v, 6 220uf 16v, 3 220uf 25v, and 16 100uf 16v capacitors on this motherboard, all cheapo PEACE electrolytics. I went ahead and replaced all of them with brand new, genuine, nichicon audio grade capacitors (yeah its a huge waste of such a fine capacitor in a set like this, but really, this thing looks brand new, so I figured I would stick the whopping $15 of parts I have into it) into the main board.
Testing the old capacitors will most likely show the capacitance to be almost dead on, ESR may also be relatively close, but when there is a load on these, that's when things start to happen, and that's why they must ALL be replaced, to prevent any future failures.
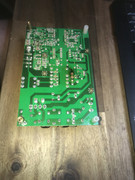
The set is relatively easy to take apart, theres less than 20 screws to remove the back cover, and it just pulls right off without any effort once the screws are out, revealing the PSU, inverter, and main board.
As a recommendation; it is a good idea to recap the entire power supply as well. I have not detailed the capacitors on this board, but since you are most likely in the set at this point, you should be able to easily see the capacitor values on the PSU. The capacitors on it are just as cheap, and likely to fail as the ones on the mainboard. Replacing all the capacitors on the PSU and mainboard, with quality genuine capacitors from a reliable source (NOT EBAY SELLERS IN CHINA!) I recommend nichicon because of their very high reliability over time, they cost more than most brands, but are completely worth it if you don't want to fix the set again in the future.
That sums it up. Provided all parts were installed correctly with a decent soldering job on the connections, the set should behave like a good working set again. I hope this write-up helps those of you who were like me; hoping to find a quick fix to get your set going again! |
|
|
|
Post by jeremy on Mar 29, 2014 12:57:08 GMT -5
Crabb, I'm working on getting a couple of these that have power issues. If I can't get one of them repaired, I would be willing to sell you the board you need out of one of them. I'll let you know when I get them if you want.
|
|
|
|
Post by jeremy on Mar 28, 2014 10:09:20 GMT -5
Been getting a couple of these older model Sony HD projectors in, and they are overall great projectors for their age and specifications. If you have one of these and it has suddenly developed garbled video, lines in a certain color (Red, green, blue, or a combination of the 3) then your projector is likely suffering from a worn out power supply.
I've noticed that a few of these that I have here with hours exceeding 7000+ on the chassis, that they will begin to develop a sporatic buzzing sound, bulb will sometimes not ignite, or worst case scenario, your image gets all garbled and turns into crap.
The cause: These 10+ year old projectors are beginning to fail because the capacitors on the power supply. The ESR and capacitance has gone out of tolerance from usage, age, etc... The good news is, after a recap, the projector should come back to life like nothing ever happened!
The power supply on these is located on the front left corner of the projector (when facing the lens), it is about 10" long, 4" wide, held down by 2 screws, one on each end. You will have to disconnect the PSU from the A/C Socket board directly behind the PSU, ballast from the middle of the power supply (its a bit of a pain to get to, so disconnect the smaller wires in front first), and the row of smaller wires in the front of the PSU. Once all that id done, the PSU should easily lift straight up and out of the projector.
NOTE: One tip I think most will find useful: Make sure you use capacitors that PHYSICALLY FIT into the place of the original ones. There is NOT a lot of space on the PSU, and some of the capacitors are right under other parts on the PSU. Take your time when replacing these.
Now, I'll be honest, I didn't have every capacitor on hand to redo the entire PSU, but I did the ones that I suspected would be the cause. Below is a list of the ones I have replaced to return the projector to a working state:
220uf 450v 220uf 450v (Both of these capacitors MUST be replaced, they may read okay, but they are over a decade old, and under a load may break down and cause issues down the road) 10v 1000uf (1x) 4.7uf 50v Tall cap (1x) The below capacitors are under a sub board on the PSU, the sub board has 2 connections connecting and holding it to the PSU, carefully remove this board by pulling it straight out from the sockets to get to the capacitors under it. 4.7uf 50v short cap (1x) 10uf 50v short cap 10uf 50v short cap
Now, remember that sub board that I just had you remove? There is a 220uf 50v capacitor, and a 3300uf 35v capacitor on it that need to be replaced as well.
Once all the capacitors above were replaced in my VPL VW10HT power supply, I reinstalled it, and fired the projector up. My garbled green image was now a perfectly normal image after the repair. I would like to mention that even though I didn't replace every capacitor on the board, I HIGHLY RECOMMEND replacing EVERY capacitor on the Power supply. This will eliminate buzzing, and provide a much longer life span of your PSU and the projector.
The remaining capacitors on the PSU board are the following values:
2200uf 35v (2x of these) 3300uf 50v (2x of these) and the majority of the remaining little capacitors (about a dozen of them) they are 47uf. I don't remember the voltage of these off hand, but it must at least be what the original capacitors are when replacing.
That about sums it up. Carefully reassemble the projector, some may find it easier to plug all the wires into the PSU board before mounting it back into the projector; whatever works best for you. The projector should now be returned to a fully working state. I cannot guarantee that this will work for every projector of this model obviously, but if your projector is just suffering from getting a lot of use over the last 10 years, then this is more than likely all it will need.
Note: It is also a good idea to clean the optics of the light path (Lens, LCD Prism) if you feel comfortable doing so; to remove the lens and clean it, as well as the face of the LCD prism. Use a non scratch cloth on the surfaces as these surfaces will scratch easily. Use nothing but Dish soap and water on the surfaces! DO NOT rub hard!!! You WILL damage the coating on the LCD prism and lens!!! Most importantly: BE PATIENT! |
|
|
|
Post by jeremy on Mar 23, 2014 10:43:21 GMT -5
MT, Got this receiver going, was a blown FR channel and SR channel, finally got around to getting it fully repaired. I need to know what the adjustments for the amplifier are if you have them?
Thanks, Jeremy
|
|
|
|
Post by jeremy on Mar 18, 2014 16:23:32 GMT -5
I tell you what, I have it on the bench, so its ready for some work, I just received another pallet of projectors today so I should probably put this off until this weekend if that's ok with you. It'll give you some time to work on your stuff as well as me having time to get these sorted out. And no biggie on the delay, I don't expect HT receivers to ever be easy fixes, just happy when they are.  |
|
|
|
Post by jeremy on Mar 18, 2014 9:05:27 GMT -5
Any luck yet MT? For the record, I don't think its just bad solder joints, pressing down on the DSP chips (or any chip for that matter) didn't affect sound or functions, so I'm betting the DSP is completely dead, or I'm way off base on what the issue is.
|
|
|
|
Post by jeremy on Mar 17, 2014 9:26:16 GMT -5
MT you may remember that I had these last year. Both of them have identical issues where, when the Room EQ or Tone controls are ON , all sound cuts out completely. Turning them off makes the sound come back like normal.
Basically - No tone functions, No EQ functions, Anything that has to do with the DSP makes the sound cut out.
So I am wondering, can this be repaired on these models? Does anyone have spare DSP boards? I would like to fix both of these so they can stop collecting dust in the corner. From what I read online the DSP seems to be the cause, that along with the Onkyo No sound thread on this site seems to be an identical issue, only different brand receiver.
How should I proceed? |
|


 ) but since I'm keeping that, its not a priority. I have about 12 home theater receivers I managed to pick up for less than the price of one new one, all with some sort of issue or another., (the main issue with most is they wont power up at all).