annapl
Junior Member
 
Posts: 37
|
Post by annapl on Sept 17, 2018 11:40:24 GMT -5
i have a onkyo tx-nr646
i was listening to songs suddenly there was no sound
and there is also no test tone
video is ok but no audio
tried to update firmaware but dsp write stuck at 70% with error 1.83
|
|
annapl
Junior Member
 
Posts: 37
|
Post by annapl on Oct 18, 2018 3:09:14 GMT -5
i wrongly posted in private message to tjmotter (he is a great helper) i just wanna all to know the updates postiong all coversations below reply by tjmotter The fact that you could start the DSP firmware update is a good sign. It means the DSP chip is likely ok. The problem would appear to be the firmware chip. This is an easier fix but it is not an easy fix. Are you close to Houston Texas? If so, I could take a look at it for you. reply by tjmotter First, you would need to go into the Onkyo setup and make sure that HDMI Control (under the Hardware menu) is turned off. Next you will need to go to this site and follow all the instructions for a "USB Installation". www.intl.onkyo.com/support/firmware/tx-nr646.htmlI would be concerned about trying to fix your board simply because I don't have an NR646 to test it with. I do have a bad board that I have pulled some parts off of but I don't know if the DSP firmware chip is ok. Let's start with the firmware update from the Onkyo site and decide from there. HTH Todd reply by me tried usb installation fails at 70% older firmware fails at 90% give error 1.83 i tried to reflow the chip with flux and heat gun with a help of a technician but it didnt help now wifi and bluetooth is greyed out reply by tjmotter That means that the reflow process broke a connection on the DSP. Wifi and bluetooth are driven by the DSP chip and if they are greyed out, it means that the chip is not booting. This needs to be fixed first before you try to fix the firmware. I would try to reflow it again. |
|
annapl
Junior Member
 
Posts: 37
|
Post by annapl on Oct 18, 2018 3:10:20 GMT -5
|
|
annapl
Junior Member
 
Posts: 37
|
Post by annapl on Oct 18, 2018 3:15:59 GMT -5
|
|
annapl
Junior Member
 
Posts: 37
|
Post by annapl on Oct 18, 2018 3:17:56 GMT -5
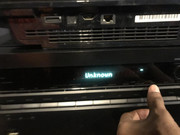
when i press disply for 3 seconds   |
|
annapl
Junior Member
 
Posts: 37
|
Post by annapl on Oct 18, 2018 3:20:40 GMT -5
|
|
|
|
Post by tibimakai on Oct 18, 2018 9:56:54 GMT -5
Question marks are a bad sign.
|
|
|
|
Post by tibimakai on Oct 18, 2018 9:57:55 GMT -5
Should I try removing the 646 nand flash and try reading it? I'm working on one as well, but different issue.
|
|
|
|
Post by tjmotter on Oct 18, 2018 10:07:57 GMT -5
Should I try removing the 646 nand flash and try reading it? I'm working on one as well, but different issue. Only if you have another to replace it with. Bad Blocks cannot be fixed. If you think that the firmware is the issue, first connect a PC to the diag port and monitor the boot process to see what is going on. This particular case is unique because the update process is failing late in the process. Failure at 70% would indicate that the system cannot write to that section of NAND (because the blocks have gone bad). In most other cases, the bootloader gets corrupted. This can often be fixed without removing the NAND.
Your issue is different than annapl's issue. You will accomplish nothing by removing the chip unless you have a good one to replace it with. On this note, the DSP subsystem is unique to the chip, not the system. Having said this, it is impossible to determine if Onkyo makes slight tweaks between the firmware for each system. For this reason, I have had success in using the firmware chip from a different model that uses the same DSP chip (like an NR616, NR626 but NOT the NR636 that uses a faster DSP), and installing it on the bad board. This will generally allow the DSP to boot so that I can then use the Onkyo firmware update to get the firmware to match the system.
Note, if you do this, the MAC address of the Ethernet controller will change to the address of the board you pulled the firmware from. This is relatively easy to fix (once you get the system to boot) and requires a PC, a Serial port and a Terminal program like Putty. With this, you can interrupt the boot process, update the MAC address and restart the system so that everything matches.
HTH
Todd
|
|
|
|
Post by tibimakai on Oct 18, 2018 10:11:12 GMT -5
I don't have issues, I could remove it to help annapl and we would have a good firmware.
|
|
|
|
Post by tjmotter on Oct 18, 2018 10:28:42 GMT -5
I don't have issues, I could remove it to help annapl and we would have a good firmware. 2 things need to happen to make this work:
1) Annapl would need to have access to a NAND programmer that can read/write to a Toshiba TC58DVM92A5TA10 2) Annapl would need to source a new Toshiba TC58DVM92A5TA10 that has no bad blocks
The issue here is that NAND chips are designed to have bad blocks and use a layer of intelligence in the bootloader to manage them. In this type of case, we have no way of initializing the bootloader so the only way to make this work is to grab a full image of the good chip (including the bad blocks) and then copy that image to a NAND with zero bad blocks. This is the only way I have found to create a perfect image. This is very important because the code on this chip is mapped to very specific addresses. If you try to copy a full image to a chip that has existing bad blocks, the programmer will try to move the code to a good block. This simply doesn't work because this will change the address of where the code resides and the DSP will fail to boot.
FWIW, I often find that I have to buy 3-4 NAND chips to find one without any bad blocks.
Also, if you use this approach, it is highly recommended that afterwards you connect a PC to the diag port and change the MAC address of the NIC back to the correct value. The system will work if you don't but it means that there will be 2 identical MAC addresses on the internet. This will typically only create a problem if both are connected to the same router but the proper process would be to update the bootloader to have the correct MAC address.
HTH Todd
|
|
|
|
Post by tibimakai on Oct 18, 2018 11:30:28 GMT -5
You are right, he needs to tell us what is willing to do first. How far he is willing to go, with the repair.
How do you check a nand, if it has bad sectors?
To watch on a PC how the Onkyo boots, do I need a Bus pirate for that? I remember that a while back, you have mentioned to me that I should get one.
|
|
|
|
Post by tjmotter on Oct 18, 2018 12:05:44 GMT -5
You are right, he needs to tell us what is willing to do first. How far he is willing to go, with the repair. How do you check a nand, if it has bad sectors? To watch on a PC how the Onkyo boots, do I need a Bus pirate for that? I remember that a while back, you have mentioned to me that I should get one. The only way I have found to get a map of bad blocks is to use the "NAND Map" feature on my Flashcat programmer. This will completely erase the chip but it will analyze each block and report out which blocks are bad. If I see a bad block, I throw the NAND away because it won't work for me.
The DSP has a UART in it so the diag port provides the TX, RX and Ground signals necessary for you to connect a PC based serial port to. In theory you could simply use a USB serial port and connect the TX/RX/Gnd pins (note, like all serial ports, the TX on your PC connects to the RX on the other device and the RX on your PC connects to the TX on the other device). The challenge is that I have a cheap USB serial port device and when I tried this, I had no success. A Bus Pirate does a lot of things but one of them is that it also provides a Serial Port interface. This solution seems to work really well. Essentially I make the electrical connections first, then I use Putty (freeware Terminal program) to connect via the Serial port option. Once the buspirate session opens in Putty I press the "M" key to set the buspirate mode to UART. The system then prompts me to set the correct speed (115,200), parity etc. (defaults are fine) and finally, once I am back to the buspirate prompt I enter "(0)" which places the buspirate in a type of passthrough mode. Now, when I turn the Receiver on, I can watch the DSP boot up.
Here is a video showing how I tested an NR709 board using the buspirate. In it you can see the DSP booting.
Note that I built an interface board to make this easier but often I simply connect the the GND to a piece of metal on the board and then push a piece of wire into each of the two diag ports (TX/RX).
HTH
Todd
|
|
annapl
Junior Member
 
Posts: 37
|
Post by annapl on Oct 18, 2018 14:30:41 GMT -5
i don’t have access to any nand programmer i will try to find a nand programmer
ill buy that nand chip
|
|
|
|
Post by tjmotter on Oct 18, 2018 15:23:26 GMT -5
|
|