|
|
Post by justgreg on Feb 24, 2014 15:25:20 GMT -5
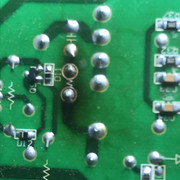
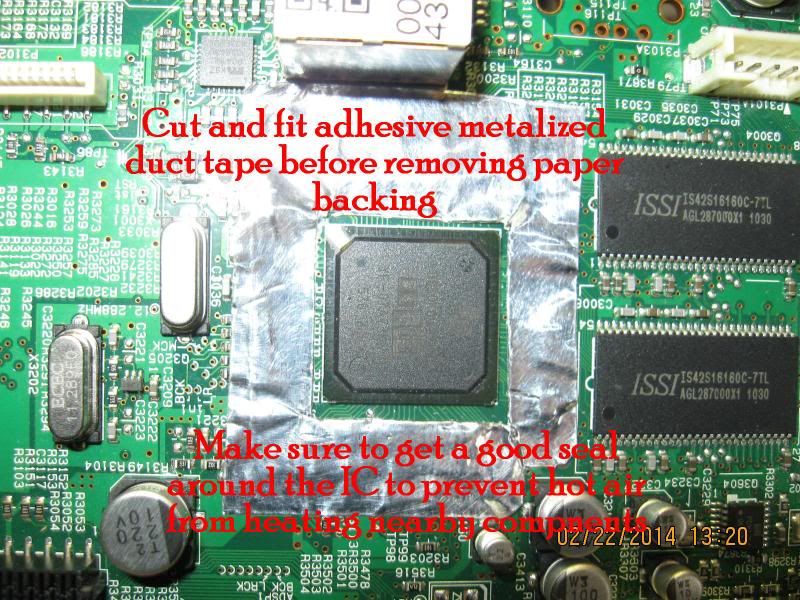 Board removed with adhesive backed foil duct seal tape cut, fitted, and installed to made around the IC. You want to make sure no components can be seen. We don't want to accidentally blow them off while reflowing the IC. |
|
|
|
Post by justgreg on Feb 24, 2014 15:22:01 GMT -5
|
|
|
|
Post by justgreg on Feb 24, 2014 15:21:03 GMT -5
 Backed up a step to show the location of a connector not illustrated yet. |
|
|
|
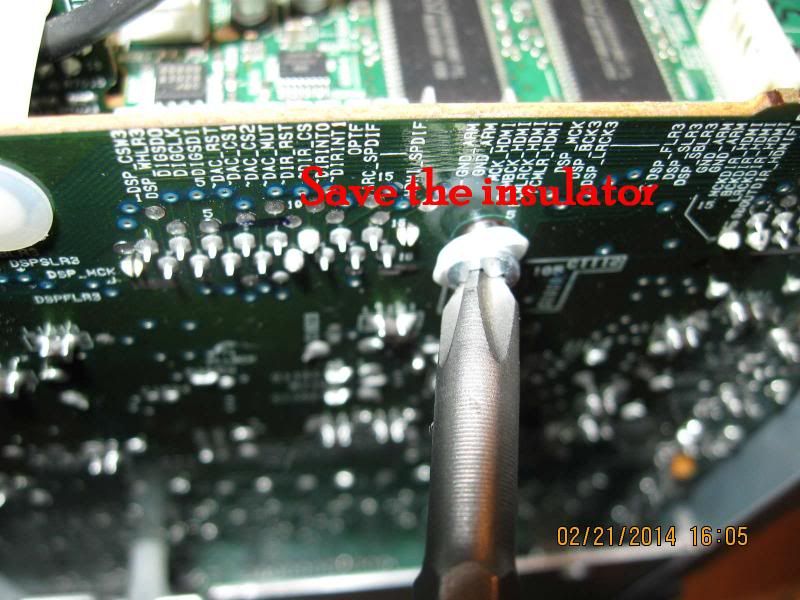
Post by justgreg on Feb 24, 2014 15:19:20 GMT -5
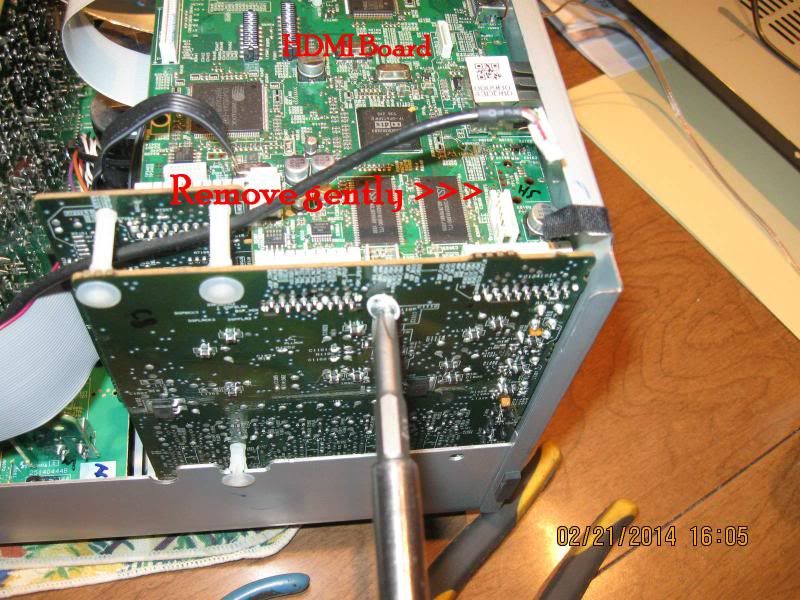
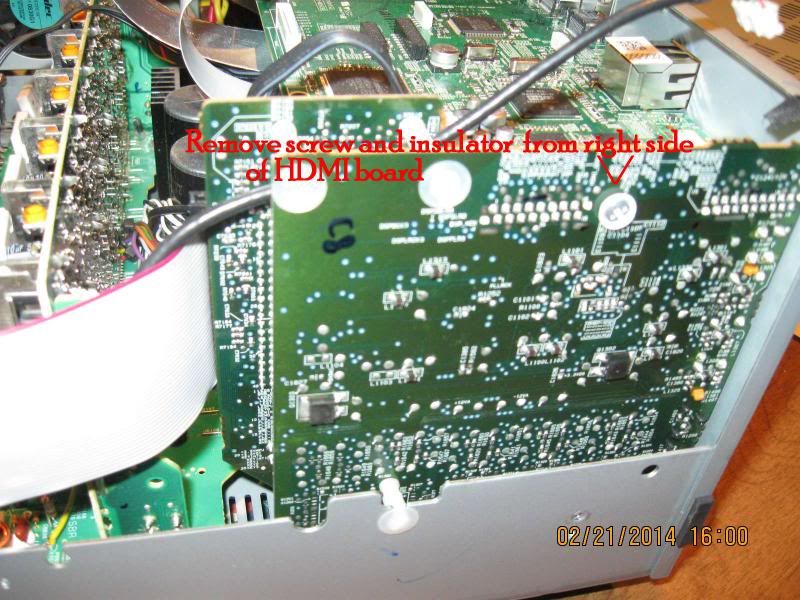 Remove 8 machine screws in the back; one above each HDMI port. Remove the insulated screw on the right side (front panel facing you) that secures the HDMI board to the board shown. Don't lose the insulator. Replace it if the screw has pulled through it to keep the two boards isolated. |
|
|
|
Post by justgreg on Feb 24, 2014 15:17:13 GMT -5
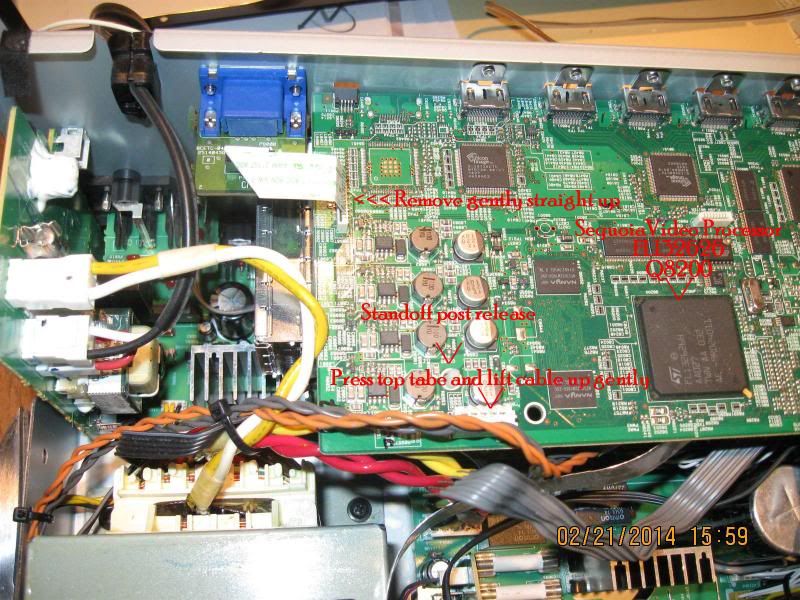 The left side of the HDMI board. Note the notation how to release the grey cable from the connector and the standoff mount you have to release. |
|
|
|
Post by justgreg on Feb 24, 2014 15:14:54 GMT -5
 Cover of 708 removed. 2 screws on each side of the cover, 2 along the top back lip, and slide the cover to the rear while lifting. |
|
|
|
Post by justgreg on Feb 24, 2014 14:31:38 GMT -5
Ahhh. Thanks Boss.
Is it safe to assume click to enlarge thing is only valid after it's been posted? Doesn't do anything except highlight the image before then.
|
|
|
|
Post by justgreg on Feb 24, 2014 14:08:57 GMT -5
Agreed on the patience part. Never been my strong suit but the seller didn't reply for a full business day and I know I would have had the roles been reversed. I make no apologies for what seems like impatience. Others would have immediately filed a Dispute. I tried to talk with the guy but got angrier every time he replied and dealt with me like I was being unreasonable. I don't take well to being told to shut up and deal with it. (paraphrase) I didn't just have some spare cash and time to play with so for lack of anything better to do closed my eyes and threw an electronic dart at something to buy! I sought out the item to address a specific need so yeah, I was excited about receiving it and utilizing it. Shame on me for that eh? I don't expect anyone to sit in front of a computer for the Average Joe Sixpack bidder, but this guy has a store and reaps the benefits of online sales. Sales come from customers, customers need to be catered to. Period. If that's changed as an important part of doing business I missed the memo. Limits? Sure. But indifference and apathy are a surefire way to go out of business. Addressing an earlier comment related to the unopened package...Why open it? I can tell from feeling the soft envelope the remote is gone. How can I use the player without the remote? Should I buy another exact remote for 20 or 30 bucks? Should I search out the discreet codes and purchase a universal remote? That's as ridiculous as expecting the author of that comment to sit in my house and manually operate the front panel buttons for me. I know this may be an archaic ideal these days but the seller should have an obligation to catering to his customers needs, regardless if it's their sole source of income or not. Sellers set expectations for the buyer; either stated, implied, or historically established. My reasonable expectation of receiving an item as it was shown and advertised were not met. I realize the Seller didn't damage the item himself but he played a major role in the eventual outcome. In this case, as it relates to online bidding sites, buyer ratings will make or break you just as quick as not checking your investments at a frequency that is demanded by your level of participation. I've finally opened a Dispute today. To say I didn't work with the seller would be grossly inaccurate. Call me weird but I don't like being blown off or stalled while seeking a timely resolution when a purchase goes bad. If the seller can't commit an equal amount of time before and after the sale (if required) he should pack up his pots and pans and move his wagon. I personally will not just suck it up and move on as has been inferred I should do while my money is jingling in the sellers pockets and I have an unusable item sitting here. Admin: I won't post any more to this. If you want to delete it that's fine. I was looking for insight and advice that others could learn from later but reading back I came across as ranting, which although felt good, won't solve my problem or benefit this site in the long run. I apologize for that. EDIT: I would have put this thread in the Off Topic section at the bottom of the forums page but it doesn't appear to be open for business.  |
|
|
|
Post by justgreg on Feb 24, 2014 10:35:56 GMT -5
I bought the Anatek ESR/Low Ohm tester kit around 8 years ago and it still continues to be one of my favorite meters to use, probably because I had to assemble it myself. It is capable of in-circuit cap testing and I was skeptiical but so far I haven't been able to catch it being wrong so it's reliable. One thing it won't test is in-circuit non-polarized caps. I haven't tried out of circuit yet because it was just yesterday I discovered that while testing caps in a MMT speaker crossover it can't do non pol's. One thing I didn't know it could do until watching the youtube vid on the Anatek site was to determine the viability of batteries. They test a power tool battery in the video and immediately know if it's will hold a charge or not. Pretty cool. It would be nice if the At-a-Glance stick-on reference chart showed more range but I assume it's possible to extrapolate my own numbers for caps I test that are out of range of the chart, I just haven't gotten around to it. shop.anatekcorp.com/products/component-analyzers/blue-esr-kit/?query=category.eq.Component%20Analyzers&back=productsLooking at their website I see the price has come down over the years and they've increased their test equipment product lineup for other component testers. I've seen similar testers online for much much more but given the quality and reliability of the Blue ESR/Low Ohm tester kit over the years I'd definately feel more comfortable buying the Anatek brand over other brands. FYI: I don't work for Anatek nor do I sell their products or receive any compensation for endorsing their products. I'm just a humble learning electronic repair hobbyist and know how easy it was/is for me to use the Anatek ESR tester so I can focus on getting right to work enjoying the hobby. Next tester phobia to conquer?...an O-scope. I'll hopefully be able to find a deal on a 2ch 100MHz unit once I recover from back surgery I'm getting March 6th (shiver) and get back to work and have the $$. |
|
|
|
Post by justgreg on Feb 23, 2014 21:38:43 GMT -5
The pics I'm trying to use are in jpg format and under 1meg. I'm trying to insert the attachment first, and then enter text under it. It only allows me to put the pic in, smaller than it opens locally on my computer but when I try to enter text the pic highlights blue like it's been selected and that's it. Can't type anything or un-highlight the pic. I have to abandon the attempt to get out. Previewing without posting it does nothing. Pic sits there highlighted. No finger cursor on pic to enlarge it either.
What am I not doing?
Thanks!
|
|
|
|
Post by justgreg on Feb 23, 2014 21:14:55 GMT -5
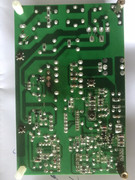
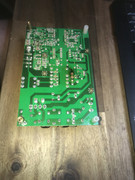
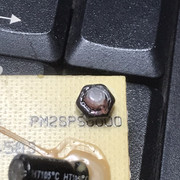
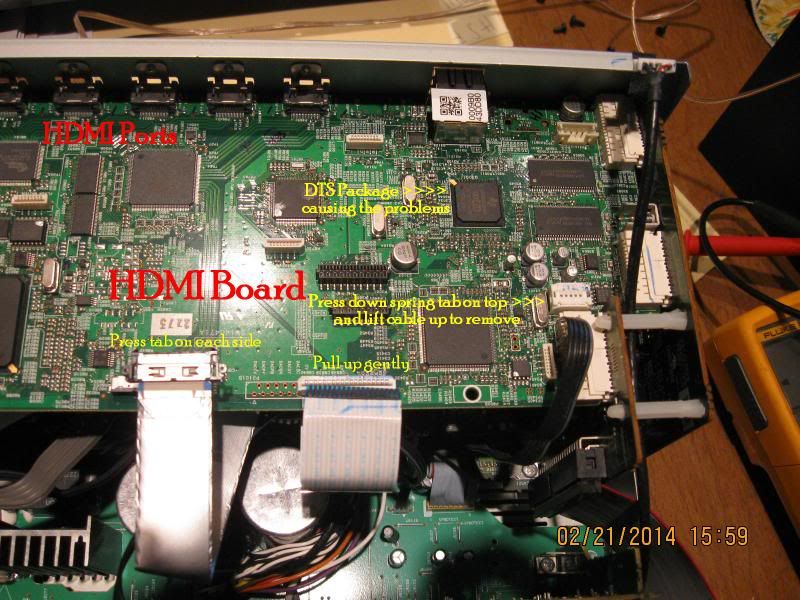
This pictedure as I call it is for reflowing the BGA IC on the TX-NR708 HDMI board, p/n BCHDM-0471 that is responsible for so many internet posts for Onkyo receivers with no sound. The IC in question is on the top side, top right corner of the board. The IC is manufactured by Texas Instruments and has been the subject of Texas Instruments internal memo's for premature aging, and ultimately the decision to halt production before they'd planned. The part number is D830K013BZB300, Q3001.
This procedure will be the same for other models, brands, or any BGA IC. Admittedly this isn't an ideal approach but for the occassional electronics hobbyist it's better than many procedures I've read on the net such as foil or towel wrapping boards and tossing them in an oven or hitting the IC mount location with an industrial heat gun designed for stripping paint.
There's a lot that goes into reflow work in general but especially when working with BGA components. Even manufacturers have a difficult time making it work; which is why so many electronic devices fail aside from crappy capacitors. Either way, it's why we have to pay to have our toys repaired or do it ourselves.
The second part of this, that I'll get to later on, will illustrate recapping the majority of the caps on the HDMI board. I didn't do the very smallest such as .47uf because they don't fail as often as the larger ones do. I did test them with an ESR meter though. Replacing caps in itself is no big deal for most moderately capable electronic repair DIY-ers, but I had double duty with this one because somebody tried to replace the caps before I got the receiver and destroyed a couple traces.
EDIT: I'm not going to post this second part as component replacement and general boardwork is covered in other threads and would be redundant.
I lay all the blame (credit) for bidding on this TX-NR708 on Mac, Nash, and others here. I'm no electronics genius by any means but the energy and excitement they demonstrated made me want to be part of the fun. I wanted to take my electronics interest to the next level and I couldn't have asked for a better environment than that of this forum. I never had any real structure to how I made repairs but with the gracious mentoring and support available here I know I'll finally be able to add structure and understanding to my repairs.
So I got the Onkyo for $46.13 plus shipping and knew going into it that it powered up but had no sound. I did some research while the auction was running and felt good about my ability to repair it so sniped it at the last second. I knew I wanted it before the auction closed so got my electronic hands on a copy of the service manual. If you want to learn, which is what I'm doing, having the service manual is critical to not just learning, but a successful repair.
For the weekend warrior or occassional electronic repair tinkerer such as myself, one thing I realized when undertaking something like this is to first be honest with yourself regarding your capabilities. That isn't to say don't do it just because you don't have any formal training but rather mentally commit to seeing it actually work when you're done. When you're done means it works, not that you got your butt handed to you so tossed it in the trash.
Make sure you have a reasonable selection of tools to do the work, or can borrow them until you get your own if you find you're serious about electronics repair as a hobby. And most importantly; safety. Most children are told or learn the hard way what electricity where you don't want it can do. ALL electronic equipment not only multiplies but stores electricity to some degree. Some more than others but regardless, take some time to learn what you can and can't do with your bare hands.
Nuff lecturing...now let's get to the fun stuff!
|
|
|
|
Post by justgreg on Feb 23, 2014 20:55:48 GMT -5
LOL exactly Mac.
Thanks Nash. I used an online editor called Fotor Photo.
OK...now to post what I marked up. I didn't notice I could change the quality in the first two pics so they're a little big...around 800K.
On with the shoe!
|
|
|
|
Post by justgreg on Feb 23, 2014 13:58:12 GMT -5
I ran the 708 for about 8 hours last night, not very hard because wife was sleeping. It's in a cabinet, second shelf without the back on the cabinet. I keep the glass door open when everythings running too.
At the end of the night I felt the top cover and didn't feel what I would consider excessive heat as has been talked about around the net. I listened for the sound of the small circulation fan but didn't hear it, which doesn't mean much. I'm going to pull it out of the cabinet and run it hard to see when/if the fan turns on. Have to hit the schematics to see if there's a thermocouple controlling it.
I didn't see the fan turn on when it was on the bench with the cover off right after getting it working but 'assumed' it was temp controlled. Now not so sure.
I've got a repurposed 1" heatsink I'm going to add to the TI dts chip. If I can find a good way to secure the heatsink I'll make it active by adding a small 12v fan.
As an aside, can anyone recommend a freebie software program to mark up pix to insert comments?
|
|
|
|
Post by justgreg on Feb 22, 2014 17:58:29 GMT -5
WOOOOOOOOOOOOOOOHOOOOOOOOOOOOOOOOOOO!!!!!!!!!!!!!!!!!!!!!!!!!!!!!!!!!!!!!!!!!!!
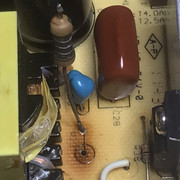
I found another broken solder trace and it paid off staying up until 4am studying the schematics and learning because I was able to run a fly wire. I also had a little glitch with a radial cap I used below the LAN connect block..it hit a heatsink directly under it. I had to repurpose an old but high quality one to get lead lengths long enough to lay it down.
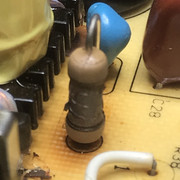
Yup on the no bumping rule. I read a ton last night from different white paper sites and dipped my toes into thermal thresholds and profiling. Wait til you see the pics of the coffer damn (as I call it). I made it out of adhesive backed metal duct tape. Dropped a little ball of new solder on the top of the dts chip and heated the chip until the solder melted then called it quits with the heat.
Is it OK to post pics here or should I start another thread? There's quite a few pics...around 15 but they'd make a great pictorial for someone tackling the same or similar tasks.
Umma go change out my old faithful 7 year old Onk and see what damage I can do to the wifes hearing. muaaahaaahaaaaa!!
Thanks for your help yet again Mac...this time around though I learned how to fish instead of waiting for a handout.
|
|
|
|
Post by justgreg on Feb 22, 2014 14:17:37 GMT -5
Got it. Can I scratch off a bit of coating from the big pad under the cap and mount to that> I couldn't figure that out by looking at page 67. It 'looks' like I should be able to. To me it looks as though the missing pad fine trace ran off it.
Thanks again man. I'm having a blast with my $40 purchase so far!
I bought a mini heat gun and am in the process of making a coffer damn around the dts chip to reflow it. I bought some no clean liquid flux. I'll take some pix of my 'rig' to share later.
|
|